
Hello to all, In our previous blog we learned about Salesforce Data Management in this blog we are going to learn about Data Loader.
Data Loader:-

Data Loader is a client application for the bulk import or export of data. Use it to insert, update, delete, or export Salesforce records.
Data loader is a client application that needs to be downloaded to the desktop directly from Data Management sidebar. Data to be loaded can be specified from a user interface or command line interface(Windows only).
- Data Loader is used for bulk import, update, delete or export of data and can load up to 5 million records.
- It can be operated either through the user interface or the command line (available in windows only). Command line Interface is useful for batch operations. We can schedule regular data loads, such as nightly imports.
- Import and Export is done via CSV files with each row in a CSV file creating a record while each column maps to a field.
- It supports all objects.
- Workflow, validation rules and processes will fire – not optional, should be manually switched off before a data import job.
- It Gives Detailed success and error log files in CSV format.
- Support for Windows and Mac.
- Drag-and-drop field mapping.
- An easy-to-use wizard interface for interactive use.
- Data Loader supports Web Server OAuth Authentication for extra secuirty compliance.
Functions of Data Loader:
Insert :- By this we can insert new records into Salesforce.
Update: By this we can make changes to existing records inside of Salesforce.
Upsert: Upsert will update existing records. Combines the above options, updates a record if it already exists, or if not, inserts it.
Delete – Deletes records from the system.
Export – Export information from the system into a CSV format.
Export All: It will include records in the recycle bin.
Hard Delete: It will delete records without moving to the recycle bin. The ‘Use Bulk API’ setting must be enabled after installing Data Loader.
Installing Data Loader:-
1. Log in to your salesforce application.
2. Go to setup-> Data management ->data loader.

3. Install that at downloaded file in your machine.
4. To start data loader Click on Data loader.
log in to data loader:
Enter your salesforce username and password to login.
How to use Data Loader:-
- Open the data loader and choose the type of function you require.

2. Then you’ll need to enter your salesforce username and password to login.

After you’ve logged in you will need to choose an object to which you want to upload the data.
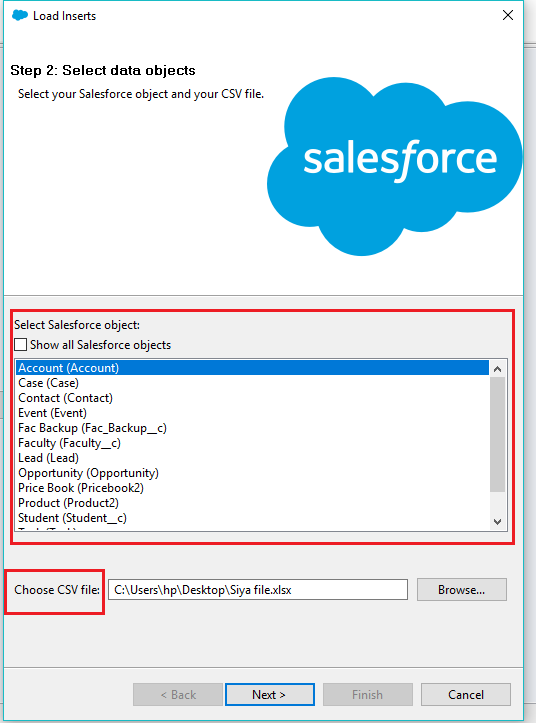
Click browse to select the CSV file.
While you are using the data loader you also need to define how the columns in your CSV file map to your Salesforce fields.
You can use an existing mapping system or create a new way to map the records.

Then you’ll only need to click ‘Next’ and the CSV upload will start once you also click ‘OK’.
Lastly hit Finish and yes to confirm.
Thank you for reading this blog.

Hi Ayushi, Thanks for the blog. It has some of the golden points that I came to know from this blog. Hope many more blogs…Again nice one.
LikeLiked by 1 person
Hello Beenal, Thank you so much for your feedback. Hope you enjoyed this learning journey.
LikeLike
Hello Ayushi, thanks for sharing such a valuable post here. You share such valid tips here to know much more about this. keep posting such great info in future.
LikeLike
Hi Tanvi, Thanks for your comment, I’m glad you found the post helpful.
LikeLike